

Last updated July 2023
Trackwork for Plumpton Green and Ouse Wharf
There are of course, many approaches to trackwork, from commercially available track and turnouts; to kits of parts; to components for scratchbuilding, and for those who choose to scratchbuild, there are many alternatives. My approach is based on lessons learned and experience from previous layouts, combined with an element of keeping up to date with current techniques.
Plumpton Green and Ouse Wharf are both built to P4 standards, but the concepts are equally applicable to EM or OO, or indeed other scales and gauges.
West Chiltington trackwork was built using the ‘Brook-Smith’ method - plywood sleepers, with rivets embedded, to which the rail was soldered. This layout pre-dated the cast whitemetal cosmetic chairs, and the later functional plastic chairs. Pulborough used the same technique for the turnouts, but used plastic track for straight sections.
Brighton Road used hand-built track throughout, combining ply-wood sleepers and rivets for both point-work, and plain track. However, not all sleepers were riveted - for straight track, typically every fourth or fifth sleeper was riveted and soldered, whilst the others used functional plastic chairs glued to the sleepers. A few sections of straight track were built using only functional chairs glued to the plywood sleepers. For pointwork the crossing and switches were riveted, with closure and stock rails part riveted and partly functional chairs. Once the track had been tested, the rivets were ground off sufficiently to enable the two halves of a plastic chair to be glued in place.
Newer methods have evolved, including plastic sleepers with functional plastic chairs; scale thickness wooden sleepers; kits of parts for turnouts (pre-cut sleepers and prepared V-crossings and switch rails); complete kits for turnouts with correct chairs.
I like the appearance of wooden sleepers, and the availability of C&L plastic chairs means that fully chaired track is a must. However, Plumpton Green is an exhibition layout so the trackwork needs to be robust (and from experience, adjustable), and I’m not convinced that trackwork entirely made from plastic will fit the requirements, which lead me towards a mixture of partly soldered and partly plastic functional chaired trackwork.
Perhaps the biggest change in my track building is the use of the computer software ‘Templot’. I’ve obviously been aware of it for some time, but have never needed to use it - I don’t think it was around when we were planning Brighton Road. As a piece of software it’s a bit quirky, especially if you’re used to using more conventional drafting aids. It took me a while to understand how to use its many features, but a few pointers and hints from friends eventually got me started. Plumpton Green is based around 1910, and ‘Brighton’ trackwork at this period was not standard - interlaced sleepering in turnouts, short check rails etc - but Templot is capable of replicating all of these features. There are many good features of Templot but the best part when planning a layout is the ease with which templates can be moved around to arrive at a satisfactory layout.
My start point for Plumpton Green was a 1:2500 scale Ordnance Survey plan from 1909, giving the basic layout, and a reasonable idea of the overall dimensions of the prototype. As described elsewhere in my Diary of a Model Railway, Plumpton at full scale would require about 60ft - and I only have 20ft available.. Templot can show an imported background plan, as well as the detailed track-plan, so by a series of incremental changes to both the background plan, and the track plan, I was (relatively easily) able to reduce the full-scale  Plumpton to a do-
able Plumpton Green, which I hope still looks like a prototypically sized country station. Templot’s ability to print a track-plan at small scale (say 10% or 20%) is invaluable at this stage, to get an idea of what the layout will look like.
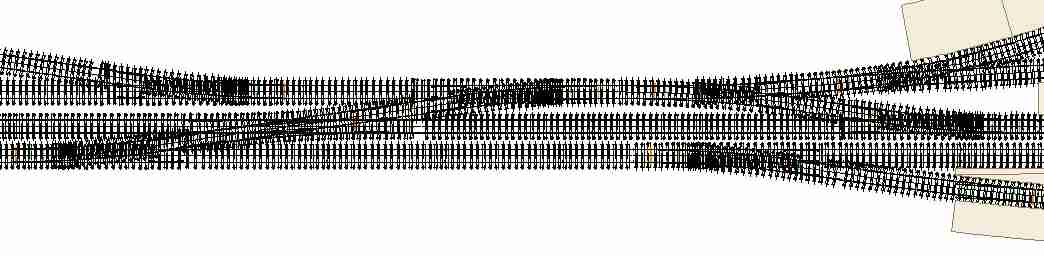
Learning how to use Templot was a bit slow, and I undoubtedly made a few mistakes along the way. Having learned the basics about how to create and modify templates (turnouts of different dimensions, straight track, parallel tracks, crossovers, diamond crossings and slips etc), I started to make detailed modifications (altering the sleepering to interlaced sleepers for example) much too early in the process. I subsequently made a few changes to the basic trackwork geometry, only to then have to make the detailed changes all over again. The plan on the right shows the final drawing of the entrance to the goods yard, with interlaced sleepering, and short check rails.
The most useful advice I was given from a friend who is very familiar with the software was ‘learn all about pegs and notches’. If you don’t understand how these work, then you’re unlikely to make much further progress.
Trackwork for Plumpton Green and Ouse Wharf
There are of course, many approaches to trackwork, from commercially available track and turnouts; to kits of parts; to components for scratchbuilding, and for those who choose to scratchbuild, there are many alternatives. My approach is based on lessons learned and experience from previous layouts, combined with an element of keeping up to date with current techniques.
Plumpton Green and Ouse Wharf are both built to P4 standards, but the concepts are equally applicable to EM or OO, or indeed other scales and gauges.
West Chiltington trackwork was built using the ‘Brook-
Brighton Road used hand-
Newer methods have evolved, including plastic sleepers with functional plastic chairs; scale thickness wooden sleepers; kits of parts for turnouts (pre-
I like the appearance of wooden sleepers, and the availability of C&L plastic chairs means that fully chaired track is a must. However, Plumpton Green is an exhibition layout so the trackwork needs to be robust (and from experience, adjustable), and I’m not convinced that trackwork entirely made from plastic will fit the requirements, which lead me towards a mixture of partly soldered and partly plastic functional chaired trackwork.
Perhaps the biggest change in my track building is the use of the computer software ‘Templot’. I’ve obviously been aware of it for some time, but have never needed to use it -
My start point for Plumpton Green was a 1:2500 scale Ordnance Survey plan from 1909, giving the basic layout, and a reasonable idea of the overall dimensions of the prototype. As described elsewhere in my Diary of a Model Railway, Plumpton at full scale would require about 60ft -
 Plumpton to a do-
Learning how to use Templot was a bit slow, and I undoubtedly made a few mistakes along the way. Having learned the basics about how to create and modify templates (turnouts of different dimensions, straight track, parallel tracks, crossovers, diamond crossings and slips etc), I started to make detailed modifications (altering the sleepering to interlaced sleepers for example) much too early in the
 process. I subsequently made a few changes to the basic trackwork geometry, only to then have to make the detailed changes all over again. The plan on the right shows the final drawing of the entrance to the goods yard, with interlaced sleepering, and short check rails.
The most useful advice I was given from a friend who is very familiar with the software was ‘learn all about pegs and notches’. If you don’t understand how these work, then you’re unlikely to make much further progress.